Today, children, we will learn how to make a peanut! A digital one, that is. It's really not that hard, provided you have some basic knowledge of any vector graphics tool, like CorelDRAW or Adobe Illustrator.
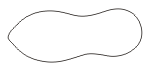
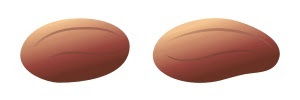
First, we make a simple peanut-like shape, as shown on the right. Then we're gonna need a bitmap texture, like they do it in 3D design, only a lot simpler. Fire up your Photoshop (or any other photo-editor of your choice)

to create a rectangle filled with a color suitable for a peanut shell, then take the lighter and darker versions of that color to make light spots and shadows, as shown in my example. It's very simple, you just need large soft brushes to achieve the smooth gradations.
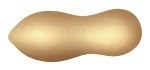
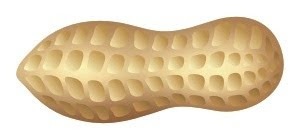
Now just import that bitmap into your vector tool and place it inside the peanut shape we created earlier. Next comes the hardest part: making those notches on the shell. Again, it's not that hard, once you know what you're doing. First, we need to make a few simple shapes, filled with a color gradation, from darker to lighter. Then we need to arrange those shape randomly along the peanut shell, with smaller shapes closer to the edges and in the middle. After that we create a few more rows in a similar way. According to our lighting model, the bottom row should be a bit darker. That's it -- our peanut shell is all ready.
But that's only half the work. Now we need to cut the shell out and place some peanuts inside. For that, we simply make a copy of our peanut shape, fill it with a much darker color cradient, reduce it a bit and adjust its curves to fit its parent, where necessary. Then we need to make another copy of the parent, but this time fill it with a lighter gradation and make it a bit larger than the previous copy, so that it creates an impression of the cut. Look at this -- now we have a huge hole in the shell!
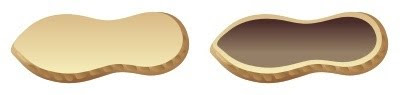
Time to make a peanut core. Basically, it's just a nut core, only longer and smoother. Also, it has some evenly distributed, barely noticeable lines along its surface. As for the color, it's reddish brown, and, like in the previous cases, we need a gradation between the darker and the lighter versions of that color.
After the peanuts are ready, all we have to do is place them inside the dark "cavity" we made before. As a finishing touch, we could make a sliced version of the peanut core, but that's optional.
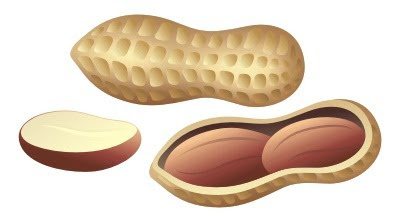
Congratulations, now we have our very own digital peanuts! And they are freely transformable and scalable, like any other vector objects. So what now? We can simply admire our peanuts, gratuitously feed them to some (digital) squirrels or, better yet, use them in a peanut label, like this one:


 First, we make a simple peanut-like shape, as shown on the right. Then we're gonna need a bitmap texture, like they do it in 3D design, only a lot simpler. Fire up your Photoshop (or any other photo-editor of your choice)
  to create a rectangle filled with a color suitable for a peanut shell, then take the lighter and darker versions of that color to make light spots and shadows, as shown in my example. It's very simple, you just need large soft brushes to achieve the smooth gradations.
 Now just import that bitmap into your vector tool and place it inside the peanut shape we created earlier. Next comes the hardest part: making those notches on the shell. Again, it's not that hard, once you know what you're doing. First, we need to make a few simple shapes, filled with a color gradation, from darker to lighter. Then we need to arrange those shape randomly along the peanut shell, with smaller shapes closer to the edges and in the middle. After that we create a few more rows in a similar way. According to our lighting model, the bottom row should be a bit darker. That's it -- our peanut shell is all ready.
 But that's only half the work. Now we need to cut the shell out and place some peanuts inside. For that, we simply make a copy of our peanut shape, fill it with a much darker color cradient, reduce it a bit and adjust its curves to fit its parent, where necessary. Then we need to make another copy of the parent, but this time fill it with a lighter gradation and make it a bit larger than the previous copy, so that it creates an impression of the cut. Look at this -- now we have a huge hole in the shell!
 Time to make a peanut core. Basically, it's just a nut core, only longer and smoother. Also, it has some evenly distributed, barely noticeable lines along its surface. As for the color, it's reddish brown, and, like in the previous cases, we need a gradation between the darker and the lighter versions of that color.
 After the peanuts are ready, all we have to do is place them inside the dark "cavity" we made before. As a finishing touch, we could make a sliced version of the peanut core, but that's optional.
 Congratulations, now we have our very own digital peanuts! And they are freely transformable and scalable, like any other vector objects. So what now? We can simply admire our peanuts, gratuitously feed them to some (digital) squirrels or, better yet, use them in a peanut label, like this one:


6 comments:
May i just say this is an ok tutorial, some people may be able to get it done but for others (like me) we need more explaining and screen shots. Such as the colouring for the peanut show us how you coloured it and go through the steps. Also with the shapes on the shell show us how we can do that. I am not the most knowledgable person on illustrator and photoshop, and this is why i search for tutorials. So I can gain more knowledge and become better at the software. You need to give me more explainations so I can obtain the end result I am trying to achieve. Sorry if i come over as a bit snotty it's just I need to know step by step in order to expand my knowledge on the softwares.
Fair enough, Lewis. My wife said the same. I guess I'm bad with tutorials. :D
I don't think your bad at tutorials just need a little more explaining, am sure people who know the softwares well will understand this tutorial.
Great design
wooowww, very nice design
Thank you for your tutorial! I've learned a lot from it. You need to try all free vector for modeling new design of your images.
Post a Comment